Monday, November 8, 2010

Overwintering Potted Plants


Maybe you’ve hit a few end-of-season sales at your favorite nurseries, but didn’t get around to getting the plants in the ground in time. Or perhaps you have some perennials in ceramic deck pots. There’s any number of reasons why you might have some potted perennials hanging about, and you’re not sure how to get them through the winter successfully.

For several years I’ve overwintered 100-200 potted perennials – some of them grown from seed the spring before, some are on their way to being large 2- and 3-year-old plants, and yet others are divided daylilies that will double by next summer. After reading all kinds of advice, talking with large nursery workers, and trying different methods over the years, I’ve found what works the best for me. Maybe it will be useful to you.

The types of northern perennials we’re talking about cannot be brought into the house – they need the cold/freezing temperatures of winter to go dormant. But potted plants tend to circle their roots around the outer edges of the pot, and so often there’s only a thin wall of plastic separating them from the cold, cruel winter world. Repeated freeze/thaw cycles can damage the roots; so can rodents, rot, all sorts of things. And, of course, if they’re in ceramic pots, as is often the case with deck plants, the combination of precipitation and freezing temperatures can crack and shatter the pot.

So here’s what works for me:
First of all, keep watering if there's little or no rain. It’s soooo easy to forget about this once the season winds down, but even as these plants are shifting into dormancy, the roots need that moisture. They are still alive, and dried-out potted plants freeze much more rapidly than moist ones, and suffer more easily. A dried-out plant will not survive the winter.

Once the tops die back, trim them back.

And then, once the weather has finally turned cold and you’ve had a good sharp frost, move the moist potted plants into a dark, unheated space; a garage, a shed, a barn, an unheated porch. The idea is to keep them frozen, or at least very, very cold, and out of the warming rays of the sun. You’re trying to avoid the thaw/freeze/thaw cycle that would occur if they were left outdoors. You can cover them if you like, but if there are any little critters around, they’ll gravitate towards that nice dark protected space and may well gnaw their way through the roots of the plants – at least, that’s what’s happened here in the past.

Yes, you can stack them one on top of the other to conserve space; it won’t hurt them.

In the spring, when the weather begins to warm and the perennials in your garden are showing growth, when the worst of the deep freeze is over, you can begin to move your pots outdoors again. This is a little tricky – there are always those spring snowstorms and freezes – but perennials are pretty hardy; just watch out for terribly frigid temps, and for precipitation followed by a freeze that doesn’t allow the water to drain out of the pots; that could encourage rot. I tend to move maybe a quarter of my plants outdoors at a time, spacing the migration over a period of several weeks, just because I’m on the cautious side.

Even under the best of circumstances, you might lose a few. But with the method I've described, I now get about a 90% survival rate in my cold Zone 5b -- I'm happy with that.

One more thing: the larger the pot, the better the chances of survival, I've found. Small plants with small root systems in small pots just have a harder time of it. It's not too late to plunk them into a larger pot, at least to give the roots more insulation.

Sunday, October 31, 2010

Fall Cleaning


End-of-season cleanup of perennial beds often seems like a chore, and there have been years where I just left it all (a la Ruth Stout) and figured I’d clean up in the spring (or not). No harm done, it seemed, except that all that vegetation is just so much more slimy and difficult to clean up after winter is over, and I’m afraid of stomping on the emerging new growth.

So nowadays, a few of the garden perennials are left for winter texture and for their seed heads that will attract the birds; but daylilies, in particular, seem to benefit from tidying up in the fall.

Always with an eye for other gardens, I’ve noticed that some gardeners cut their daylily foliage back right after the end of bloom. Most of the “experts” discourage that; as long as the foliage is green, the plant is still synthesizing and feeding the roots. In fact, cut the foliage TOO early, and the plant will send up new shoots – using up energy better saved for next year. But once the foliage yellows and browns, it can be removed.

So the photo at the top of the post is an example of a daylily that’s going into dormancy; the foliage is yellow and limp. Just take a pair of shears and cut the leaves several inches above the ground, and toss the leaves onto your compost pile.

It’s a great opportunity to remove weeds as well (because we got tired of weeding about two months ago, right?), and no doubt you’ll be surprised at how much some clumps have increased. And it's a good time to make a list of what will need dividing in the spring. AND to throw some compost into the beds, if you’re so inclined. Cleaning up the foliage makes that easier as well.

Friday, October 15, 2010

Grow your own!


We are big fans of garlic here, now that we grow our own. What a revelation it was the first time we harvested … big, beautiful purple-and-white streaked heads that seemed like a completely different animal from the store-bought stuff. And really, it is. The papery white heads commonly found in the grocery are soft-necked varieties, and nearly all of it is grown in California and shipped around the country. These are milder-flavored cloves, and for most people, the extent of their garlic experience.

And elephant garlic? – not really garlic at all. It’s actually the bulb of a type of leek.

It turns out that, while you will often read that there are hundreds of different kinds of garlic, recent DNA testing by plant biologists has determined that there are actually 10 separate, distinct varieties of garlic, with over 600 cultivated sub-varieties around the world. Five of these distinct major varieties are hardnecked types – and that’s what we grow. They tend to be the deeper, more flavorful types.

We bought our first “batch” from a neighbor who has specialized in big, beautiful, buttery-hot-tasting garlic for years, and have continued to set aside a number of the largest heads each year for replanting; selecting for the most “successful” heads improves the harvest year after year. I won’t go into detailed planting instructions – you can find that anywhere by googling – but if you want to know exactly how we do it here, just email me. It’s easy, actually; you plant in the fall, mulch well, and just wait for them to be ready the next summer. (One caveat: they really, really, really want rich soil, and if you don’t see to that, you will get smallish bulbs.)


And – bonus! – the hardneck varieties produce scapes in the spring, which make amazingly wonderful pesto, and stir-fry nicely as well. The scapes should be removed anyway, so that the plant’s energy will go into making the bulb bigger and better. Now that folks are becoming more familiar with garlic scapes, they’re seen more and more often at farmers markets. Scapes + oil + nuts + cheese = fabulous pesto; basil not necessary (but always good for additional yumminess).

Somehow, miraculously, our garlic has been planted earlier this year than ever before. There have been times when I was frantically getting it into the ground the day before a forecasted snowfall -- so it's not at all too late yet, if you're thinking about giving it a try.

Even if garlic weren’t one of the most delicious things on earth, its medicinal properties would make growing it worthwhile: it has antibiotic and antifungal properties, and has been used since forever to enhance health. But that’s another whole post sometime.

Monday, September 27, 2010

Rain at last!


All fingers and toes are crossed in the hopes that the forecast is correct -- two days of rain, perhaps as much as two inches; it's already drizzling out there. It's been a tough season for lining out daylilies; they get dug out of dusty, dry soil, and I wince for them as I pull them out of the ground. A nice soak before they're replanted helps, and of course good watering-in, but in spite of my "tough-love" beliefs, I've been watering them regularly after that as well.

Once again I can be grateful for a good supply of mulch; put on top of the new plantings, it helps to hold in the moisture and delay the drying effects of wind and weather. Next year's new raspberry row is being prepped as well with sheets of newspapers topped with thick mulch, so that weeds will be discouraged and digging will be easier next spring when we're ready to plant.


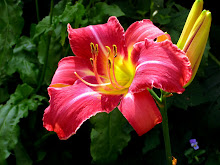
New daylily additions have been planted in the last two weeks: Persian Pattern (above), Colorful Summer, Neal Berrey, Martha Custis, Shishedo, Rose Emily, Byzantine Emperor, South Seas, Dublin Elaine (at top of post), Cherokee Heritage, Victoria Grace, Ruffled Apricot. Three of the older cultivars have produced proliferations -- tiny little clone plants located on blossom stems -- and so I am attempting to root them in the greenhouse.

Friday, September 24, 2010

It's Almost Over (well, not really ...)


The end of the growing season always elicits mixed feelings here, both for me, and I think I can safely say for my daughter-in-law as well; she too grows lots of veggies and fruits, and does some canning; we both fill our freezers with produce, soups, sauces, and pesto.
Residing in an area with the shortest growing season in the continental US, we find it hard to imagine living in, say, Florida and having to maintain this level of work for weeks and months longer. Knowing that our first serious frost will likely hit sometime in the next week or two is a relief, in a way.
And then, the cleanup. All the trellising that supported peas, green beans, tomatoes must be taken down; two or three dozen 6-foot-tall metal T-stakes have to be pulled and stored away. Pole bean vines have entwined themselves around the tepees so firmly that they’ll need to be cut away, and the poles stored. There’s row cover here and there, metal hoops, irrigation T-tape, wooden stakes, the assorted flotsam and jetsam of the growing beds to be cleared. A few rows have black plastic that needs to be taken up. The browned, dried remains of all those corn, cucumber, tomato and squash plants will go into the field compost pile, along with the mounds of weeds we’ve been pulling.
Kale, broccoli, carrots and lettuce can stay in the field for awhile longer; light frosts won’t bother them, and will actually sweeten the kale. Once there’s a row that’s been cleaned, composted, and tilled, next year’s garlic will be planted and mulched. And we’ll see how long we can keep the greenhouse tomatoes and peppers going – it would help if the broken door was replaced!
Ideally, we’ll be spreading lime and some other soil amendments this fall; ideally, I’ll be tilling and sowing some winter rye. But we’ll see. Weariness outweighs motivation at this time of year, and it’s soooo tempting to just put things off until spring. But despite thinking that this season was not so great, with the heat and dryness, I find that the freezer is indeed full again and there’s much to be thankful for.
Yet I haven’t even mentioned prepping the daylilies, the perennial beds, or the potted plants for winter! That’s another post for later.
Meanwhile, thoughts turn to quilting and knitting ...

Sunday, September 19, 2010

Garden Design on a Dime


Spring and fall are the seasons for dividing and transplanting, making changes in the garden. I’ve got a big, long list of what to move where, and have been chipping away at it now that the weather has grown cooler.

But there’s a world of difference between having a knack for growing things, and having a talent for garden design. I’m good at the former, not so great at the latter. Despite studying all those books and magazine articles, even the diagrams in seed catalogs that promise you the “perfect” garden, I’m still missing something.

Sometimes, I think it’s disposable income. The “instant” garden that’s put in by a landscape designer begins with a clean slate, and requires a serious cash infusion (not to mention a small army of workers to make it all happen). Have you seen the price tags on those beautiful flowering specimen trees and bushes? Or figured out how much a lovely winding path of peastone or pavers will cost, from excavation to the finished product?

More often, if you’re like me, we look at what we’ve got already and see what improvements we might be able to make on a limited budget – sometimes so limited that it means just moving things around in the hopes the garden will look better, like rearranging our living room furniture. It also requires being able to foretell the future, having a vision of how big that Echinacea or tickseed is going to be when it matures in two or three years … will it be too large for that spot in the garden? And, let’s face it, there’s more to it than just putting the short things in front and the tall things in back, or having a color "theme."

For years I succumbed to the impulse to purchase a pot of one thing or another that I liked, but since I never could afford more than one or two at a time, my gardens were a jumble. Then we moved, and I inherited perennial beds with great swaths of certain flowers, with repeated plantings at intervals, with tall non-flowering accent plants in the background, and I saw what a difference that made. Still, those gardens were typical straight-edged border beds. Now there are some new beds, curvy-edged; works in progress, they are. I’m still learning. But I think it's looking a little better each year.