Sunday, September 4, 2011

As the Season Winds Down ...


It’s that transitional time again, one season sliding into the next, where the usual daily routine is changing as well and leaving me feeling as if I’m in a sort of no-man’s-land. Or no-woman’s, as the case may be.

In the summer, the sun is up early and so am I, full of energy and ready to go; even sitting with a cup of coffee can leave me itchy to get up the hill to see what’s blooming. But now, it’s all different. I woke at 5:25 to darkness, feeling somewhat disoriented even though the change has been coming gradually. My day starts much more slowly. There’s nothing new in bloom; there’s very little left in bloom, in terms of daylilies, and it’s often chilly as the sun comes up over the hill. I linger over a second cup, wearing a fleece jacket in the cool kitchen, thinking of all the veggies to be harvested, the sauces and soups and blanching and freezing that lie ahead. There are still plenty of daylilies to be lifted, divided, and transplanted, but I realized at some point with dismay that I simply won’t be able to get to all of them before it becomes too late in the season. At least the old potato patch is now planted with new daylily varieties.

Weeds and tall grasses, of course, are rampant at this time of year; yellow jackets have made underground nests throughout the planted areas, painfully discovered as we pull weeds. This weekend we’ll take the brush hog to the upper field, start in on the hillside, and eventually change over to the tiller to prep areas for next year’s cover crops, garlic, and new daylily beds.

Putting the gardens to bed, taking down trellises and posts, picking up row cover and plastic mulch – these tasks are not anywhere near as exciting or inspiring as setting them all up in the spring, when the pleasure and warmth and bounty of summer still lie ahead. And the weariness that comes from a season full of work begins to take its toll; it becomes increasingly challenging to find the energy to tackle these chores.

Each season I have good intentions of starting fall crops in August; this year, the plan was to build some raised beds for the center of the greenhouse, to extend the growing season for salad greens. A terrific idea … but once again, it will not come to pass in this calendar year. There’s simply not enough time or energy. And that’s okay. We’ll patronize our friends who sell their late-season greens at farmers market, do what we can here to clean up and prepare for next year, and look forward to that long winter’s rest.

Before that first hard frost, though, there is still so much to appreciate: a bumper crop of pie pumpkins (pumpkin soup! sautéed spiced pumpkin! pumpkin pancakes!) and winter squash still ripening, kale and collards that keep on going, a lush crop of parsnips that will be left in the ground to sweeten until early spring; bunches of fresh herbs hung to dry; white phlox that decided to wait until now to blossom. Wonderful suppers, straight from the garden, and the freezer filling more and more each day. Think back to the beginnings of all of this … just a few handfuls of tiny seeds; isn’t it a miracle?

Friday, September 2, 2011

The View From Here


As someone who occasionally dips her toe into Buddhist teachings, I understand that desiring more than what you have is an endless game that cannot be won. But it’s such a common human tendency that someone long ago had to come up with a commandment about not coveting, right? Aren’t we all striving for something more/better? – whether it’s a promotion, a kitchen renovation, a new car/truck/tractor, the latest version of the i-whatever, those great boots you saw last week, or even more daylilies? How many people can truly say they’re absolutely content with what they have, and mean it for more than a day?

“View envy” is one of my bugaboos. When I was a small child in central Massachusetts, my family lived in a tiny house atop a hill. Our little living room had two picture windows. Out the front window was a vista of rooftops, trees, and chimneys, sending up plumes of white smoke on cold winter days. I used to stand on the sofa and look out that window, imagining all the people inside those houses and what they were doing. And out the large side window, way off in the hazy distance, was Mount Monadnock. It loomed in my imagination as some faraway, magical place.

Nowadays, in my fantasy world, I look out my imaginary window across fields and foothills to a magnificent up-close panorama of Mount Monadnock. Last week a friend told me that she’s thinking of selling her house, and described a view like that as hers. Of course my brain started whirring … but selling and moving, just for a view, is so ludicrous that even I can see it (no pun intended), and set those thoughts aside. For now.

And just a few days ago, a friend in Washington State posted photos of her family’s latest hiking trip … with incredibly tall, majestic, snow-capped peaks in the background. This is the kind of view that makes our Monadnock seem, well, rather less incredible. It’s that round-and-round thing … there’ll always be something better out there.

Real estate appraisers say that the most desirable views are from up high, and the more panoramic, the better. How about a hilltop with an ocean view? – and mountains on the other side? Not even close to possible for most of us!

A few years ago I read Diane Ackerman’s book, Cultivating Delight: A Natural History of My Garden. One aspect of her approach (which was a new-to-me idea but might be a “duh!” for you) is that she carefully plans and plants particular vistas that she will enjoy from different windows of her home. Now, this particularly makes sense for one whose profession is writing, who spends great stretches of time in her home office; but the more I thought about it, it seemed that creating your own view is a brilliant idea for any of us. Even if you have a small suburban lot, you can create something pleasing in your line of vision – a perfectly-placed garden, statuary, a flowering bush or tree, perhaps a flowering vine climbing up a fence or wall.

Mind you, Ms. Ackerman has a pair of gardeners to carry out her creative plans, not to mention the wherewithal to install lovely trees and bushes of good size, an astonishing variety of perennials in various gardens, and ideal habitats to attract a variety of birds and other wildlife that she enjoys. It sounds delightful, impressive, expensive, and like something that takes years to establish. But as we plan our gardens, or ponder where to install a little pond complete with waterfall, we usually make our considerations from various vantage points around our yards, outside of the house; adding the view from indoors adds a new dimension.

As I look out my kitchen and office windows, I see some of my flower gardens, one with a birdhouse that was occupied by chickadees in the spring; this summer, I’ve been able to watch hummingbirds visit the bee balm as I sit at my computer. There’s a huge old willow, more than fifty years old, that gives us much-needed summer shade. Beyond the gardens, our hillside, with tall green grasses waving in the springtime, and now with swaths of goldenrod in late summer, and needing a fall mowing. And beyond that, the Pinnacle, not really a mountain but a forested hill so large and high that we were surprised at how long it takes to climb to the top. In spite of my Monadnock desires, I’ve come to cherish this particular vista, and how it changes with the seasons. And of course I’d like to add a few things … one or two spring-flowering shrubs or trees; maybe a few maples along the edge of the hillside.

My daughter, who lives in a third-floor apartment, looks out her kitchen windows into the tops of maple trees, a lush forest of green leaves that turn various shades in autumn; it’s like being in a tree house. A friend has a beautiful Japanese red maple outside her kitchen window, and another fills her little kitchen porch with tall potted herbs and flowers, visible through the door and windows. And another looks out from her table to a rustic arbor, covered with vines. So many different ways to delight the senses!

What’s your ideal view? What do you like the best when you look out your window? What would you like to create?

Sunday, August 21, 2011

Divide and Conquer: the Step-by-Step


Do you have some daylilies that have been in your garden for years, and now they’ve increased into a large clump? That’s all well and good until it becomes TOO big, and needs dividing. How do you know if it’s time? – well, how did your clump bloom this year? If it sent up plenty of scapes and buds, and you were delighted, all’s well (for now). But did you wonder why there weren’t as many flowers as before? Did that clump seem a bit stingy with its buds and scapes? That tells you that it’s too big, overgrown, choking itself. Time to remedy the situation!

Dividing your daylilies will not only rejuvenate them, but allows you to either expand your daylily plantings, or share your excess with gardening friends. Maybe even both. And really, you don’t want to wait until that clump is so big you’ll need a backhoe to dig it out, or a week’s worth of chiropractic appointments to deal with the aftermath.

And now is the time to do it. Find out when your Average First Frost date is (here in Zone 5 it’s September 22), and count backwards by six weeks; that should (ideally) be your deadline for dividing your plants, to give them time to settle in and send out new root growth before the earth freezes.

(Let me go off on a wee tangent here: of course there’s a difference between light frosts and hard frosts; most perennials are not troubled by light frosts, and they don’t freeze the ground. So I will admit that I tend to keep transplanting later than the gardening books recommend. But in general, perennials divided in the spring will be bigger and stronger the following year than ones divided in the fall; seems logical, doesn’t it? – and it follows that the earlier in latesummer that you divide, the better. That said, if you find that you can’t get to all your dividing as early as you’d like, mulching will help to retain some warmth in the soil, thereby giving those plants a little more time to settle in.)

So, here we go:
A digging fork is the best tool for getting a clump out of the ground, with the least amount of root damage; but if you don’t have one, use a shovel, and dig a wide circle around your clump to try to preserve as many of the roots as possible.
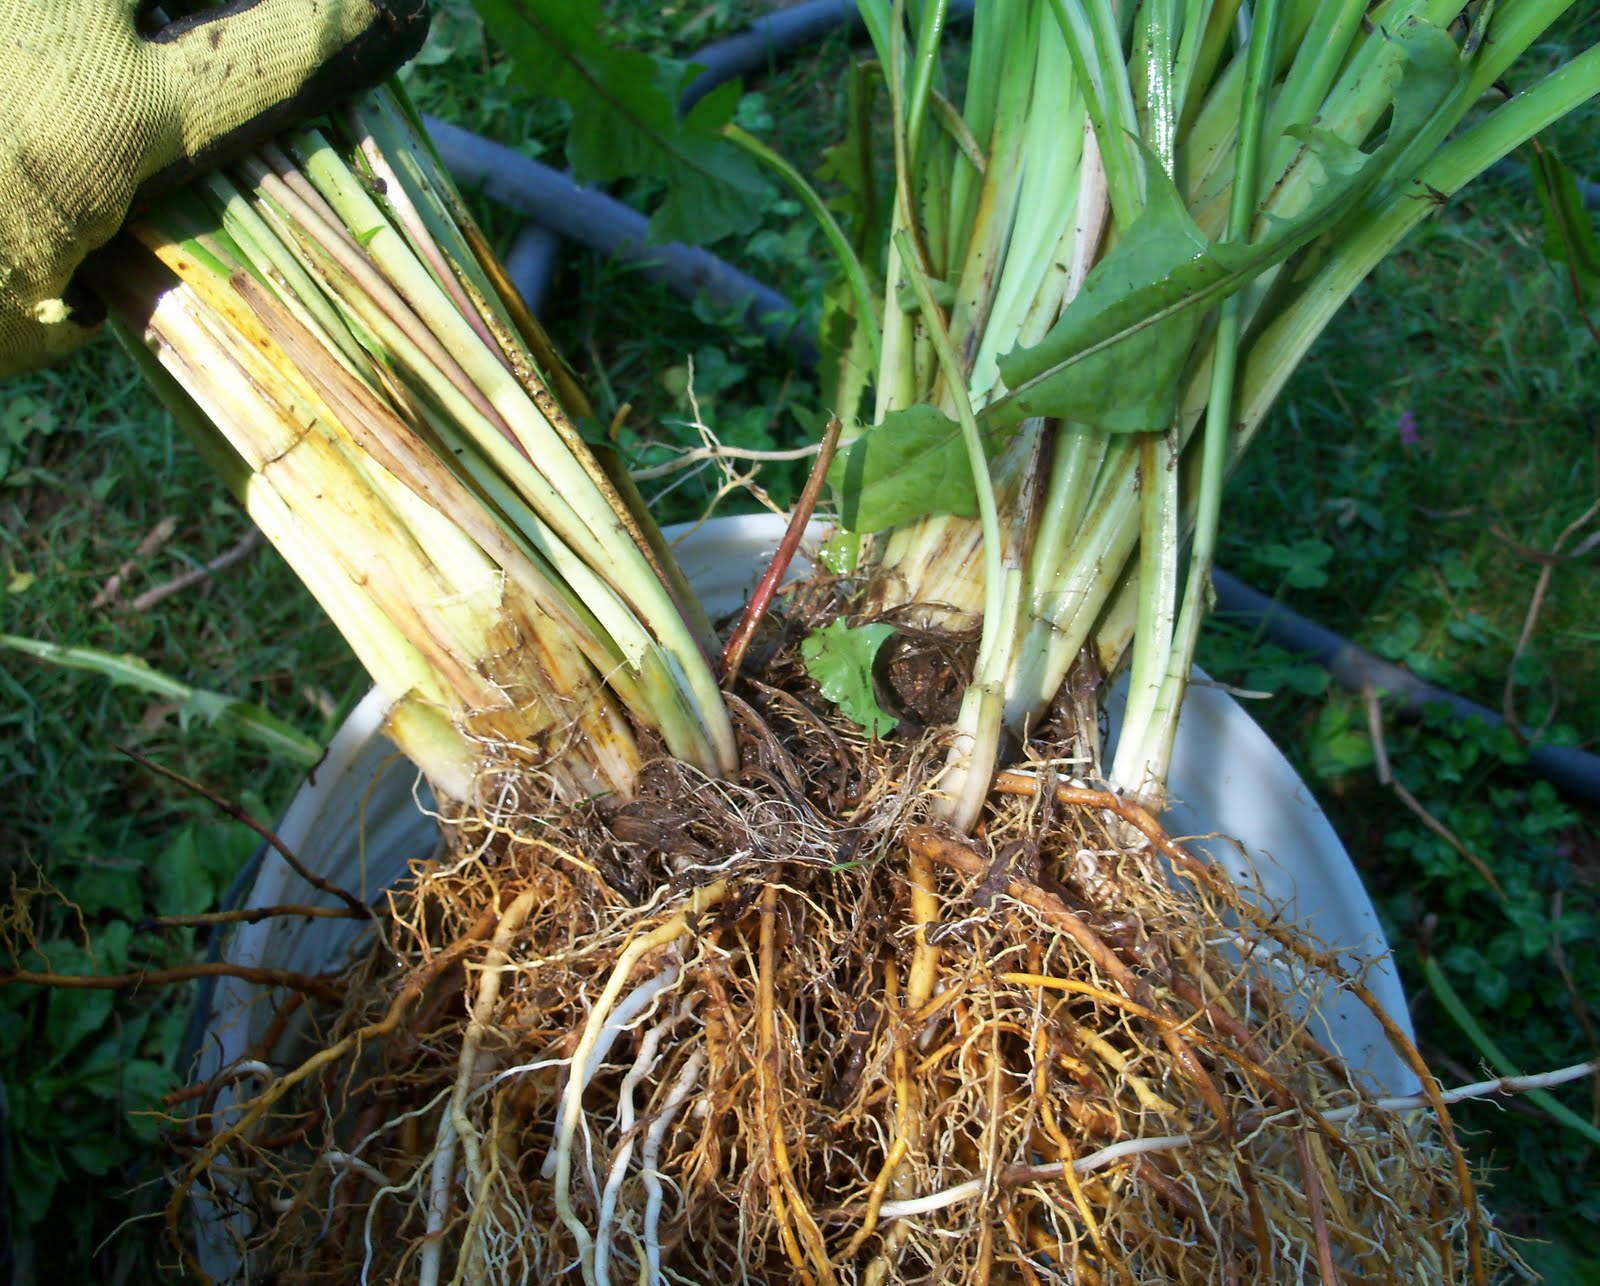
Trimming the foliage back to about 8”-10” makes the clump easier to work with. In this case, I’ve got a good-sized dandelion growing in the middle of the clump … I want those leaves intact so that I can locate that dandelion and pull the whole thing out as I divide.
If you’re lucky, the dirt will fairly easily shake off the root clump. More often, though, a good soaking and swishing in a bucket of water will do the trick, or laying the root clump on the ground and hosing the dirt off.
Now comes the fun part: dividing that tangled ball of roots! Have a game plan in mind: are you simply dividing this clump into two or three smaller clumps? Are you hoping to end up with a smaller clump for yourself, and some single or double fans to give away? Keep your plan somewhat flexible, though, to accommodate the realities of what comes next.
Some daylilies divide so easily, while others are like a diabolical giant hairball. Your goal, of course, is to keep crown and roots intact while disentangling; hold at the base of the plants and try to gently work them back and forth repeatedly to loosen. Sometimes I use a digging fork, or my fingers, to gently pry them apart to start the process. Back and forth, up and down, round and round … sometimes this process becomes less gentle and a little more forceful. Keep in mind that the more force you use, though, the more likely it is that a crown can snap off. Not the end of the world, for sure, but not what you’re shooting for here.

And once in a while, a root ball is just so impenetrable that it seems to be held together with super glue. In that case, you can take a sharp knife to divide. As long as a plant still has roots attached, it should be okay. Some folks prefer to bypass the untangling method and go straight to cutting – you can too, if you wish, but you’re losing some roots that way, and I always think it’s better to leave them intact whenever possible.
So here are ten divisions from this one clump; in all, there are 17 fans. You can see that some of these divisions have more than one fan. I've divided them out this way because I'm "lining them out," typical of a nursery -- hopefully each of these divisions will increase by next summer. The largest division, though, will go into one of my gardens in my yard.

Once you’ve divided as much as you’d like, place the divisions in a bucket of water until they’re replanted, or given away. And when replanting, I like to add some rock phosphate to the soil to encourage root growth, or some organic fertilizer that’s strong in phosphorus (the middle of the three numbers you’ll find on fertilizer packages … as in “4-10-4;” this is NOT the time to use a high-nitrogen fertilizer, as that boosts foliage production).

How long can you keep them in that bucket of water before you put them into the ground? I’m embarrassed to tell you how long I sometimes wait! Suffice it to say that several days of soaking won’t harm your plants, as long as you keep that bucket in the shade; but logically, the sooner you plant them, the better. Yes, there are many tales in the gardening world of daylilies ripped out and thrown onto the compost pile that bloom the next summer, bare roots and all, but you may not want to take those kinds of chances!

Once the ground has truly frozen, it’s not a bad idea to put some mulch around your divided daylilies; anything organic, like bark mulch, chopped leaves, straw, substances that will eventually break down and decompose and enrich the soil. And then pray for a good blanket of snow – exactly the protection our daylilies like best!

Saturday, August 13, 2011

Sow Your Own! -- Part One


Are green pods appearing on top of some of your daylily scapes, once the blossoms have dried and dropped away (or, if you’re a properly fastidious gardener, after you’ve deadheaded)? These pods contain seeds; if you’re feeling adventurous, why not try planting a few? Following some simple directions should produce some surprise-package new daylilies, and with a little luck, you might have a few that you greatly admire.

Here in Part One, we’ll go over the basic realities of how these seeds came to be, and how to gather and save the seeds. Part Two will give step-by-step directions for sowing and growing.

Without getting into Botany 101 too deeply, basically you need a “pollen parent” and a “pod parent” to make daylily seeds; or, if you like, a papa and a mama ;-). The pollen from one must fertilize the other, resulting in a seed pod. Just like human babies, or puppies, or kittens, each fertilized seed will produce something new – NOT a carbon copy of either parent, but a combination of their genes. If you want a carbon copy of a daylily, you must divide it at the roots.

Now if you have only two kinds of daylilies, it’s pretty easy to figure out who the “parents” are! But the more daylily types you have, the more the possibilities for combinations. When you leave pollination up to chance – meaning wind or bees carrying the pollen from one plant to another – you only know who the pod parent is. Deliberate hybridizing allows you to control both variables, but that’s another blog post, sometime down the road. Today we’re talking about the “surprise package” seed pods.

First of all, wait until the pods dry and turn brown. Once a small crack appears, usually at the top, you can remove the pods and empty the seeds out – but make sure that it’s a dry day, and that the pods are dry. A sunny afternoon is perfect. Place the seeds in a saucer, or on a piece of paper, in a dry airy room out of direct sunlight; leave them there for a few days to make sure all external moisture is gone.

Personally, I like to know which pod parent has produced which seedlings, and so I label little envelopes with the pod parent’s name, and place the dried seeds inside. (You may not be so picky, or may not be planting as many seeds, and so this step might not matter to you.) Either way, place the envelopes, or just the seeds themselves, into a plastic zip-lock bag, seal it, and put it in the refrigerator. It’s going to stay in the fridge for weeks, to mimic the effect of winter cold on seeds that would have otherwise dropped onto the ground.

More to come.

Monday, August 1, 2011

What's in a Name?


Have you ever purchased a daylily just because of its name? Or maybe the name was just enough to sway you into a “yes” or “no” decision? With nearly 70,000 registered daylilies out there, and many more unregistered (or “garden names,” as they’re often called), the names range from funny to ethereal to well, downright uninspiring.

Folks have named their hybrid daylily creations after books and authors (“Moby Dick,” “Gulliver’s Travels”), movies and movie stars (“Star Wars,” “Lion King”), musicians and other celebrities (“Tupak Amaru”), politicians and their spouses (“Abraham Lincoln,” “Betty Ford”), places (“Baffin Bay Beauty,” “African Midnight”), desserts (“Caramel Fudge,” “Peach Pudding”), and drinks (“Pina Colada,” “Mulberry Wine”).

Then there is the always-popular and yummy-sounding category of pie names: 73 of ‘em registered – from “Apple Peaches Pumpkin Pie” at one end to “Windham Cherry Pie” at the other. Not sure why daylilies and pie seem to go hand-in-hand, but there you are.

In another common category, daylilies are often named after people unknown to the rest of us – someone’s mother, father, grandparent, child, grandchild – you get the picture. While this certainly has great meaning to the person thus honored, these names usually don’t inspire us one way or the other. At least they don’t do it for me, except for the ones named after great hybridizers.

There’s also the names that, to my mind, are sort of generic and formal; I have some of these – “Crown Royal,” “Royal Heritage,” “Benchmark.” These sound to me like names of dinnerware or flatware sets, but they are attached to very beautiful blossoms.

And if you search for a name beginning or ending with any of the daylily colors, of course you will find plenty: 619 names that begin with “Pink,” and 334 that end that way. At least those names give you some clue about the flower itself.

My favorite category is the unusual/humorous/downright odd names (and if you know me personally, you’re probably thinking, well, THAT figures!). “Auntie’s Lipstick Kisses.” “Big Boy Bubba.” “Oliver Dragon Tooth.” “Cathy Cute Legs.” And the first truly odd daylily name I ever ran across: “Nekkid Woman on a Tractor.”

But would you buy that last one? Or the one called “Varicose Veins?” Or “Butt Ugly?” Or "Weber's Litterbox?" Yes, those are registered daylilies too! … I have to admit those names would stop me in my purchasing tracks. They'd have to be mighty beautiful to overcome those names.

This fall we’ll be dividing and lining out some of our three-year-old seedlings and putting names to them. It’s fun to come up with new names, but surprisingly difficult at the same time. It’s got to feel like it fits the flower. So far we’ve decided on these: “Berried Treasure,” “Dulcimer Music,” “Voodoo Science,” “Santoshi,” and the best one – “Princess Zippy,” for my favorite 5-year-old. See? – I’m doing it too! (And yes, that's it at the top of the post! She picked it out herself!)

Sunday, July 24, 2011

If You Are What You Eat, I'm Feeling Chicken


If you’re a vegetarian for moral reasons, you may as well stop here; this won't be to your liking. I used to be one of those, but even after nearly two meat-free years, I still craved meat desperately … and eventually came to the conclusion that it was what I needed.

Yet I still wrestle with the whole idea that another being’s life is ended so that I may eat it. And I’ve always wondered if I could actually do the deed myself, honestly facing the reality of my choices. Too many people think of meat as something that simply appears on a Styrofoam shrink-wrapped tray at the supermarket, unaware of the issues that swirl around the cruel and inhumane practices of factory farming, the medicated and GMO-derived animal feeds served up, the growth-enhancing hormones injected, all of which, of course, eventually affect our health as well. Not to mention the environmental damage that results.

Anyway, we’ve kept laying hens for years, and have had some of them butchered for us by a farmer friend when they got old. So easy, shipping them off and getting them backed all nicely plucked, bagged, and ready for the freezer; but of course, old hens are really only good for the stewpot.

This time, we’ve got meat birds. Twenty-four of ‘em, all eating like little pigs, so much so that you can nearly sit and watch them grow bigger. It only takes twelve weeks until they’re ready for Freezer Camp – they’re bred to be voracious eaters. Freedom Rangers, they’re called, and although that sounds like they are card-carrying members of the Tea Party, they are a French breed. Vive la Liberte.

It’s a weird experience for me. I have a sort of affection for my laying hens, my “girls.” They’re greeted with, “Hello, ladies!” in the morning; some run up and squat to get patted; they get “treats” of watermelon rinds and cabbage and all manner of good scraps. I always thank them when I collect their eggs, which may sound a bit woo-woo, but I’m expressing my gratitude to the Universe in general for the goodness of these fresh eggs for our table. But these meat chicks … well, I’m keeping my distance, in a way. Just a general “Hey, kids,” when I approach to give them more food and water. Of course, I don’t want to get attached to them, or find them too cute or endearing … and truly, they are helping in this regard, being a mob of semi-crazed fowl who rush any human in a frenzied manner and try to peck your hands and gobble your feet (even though they have plenty to eat in their feeder). It’s just their nature, single-minded eating machines that they are.

So they are enjoying the sun, the fresh air, the grass and bugs, the space to run around ... for another six weeks or so.

And so the question looms, unanswered so far: will I be brave/honest enough to help with the butchering this time? I think of the generations of women all over the world, stretching way back in time, who have very matter-of-factly killed a bird for the dinner table more times than they could count. I’ve cleaned and plucked before; it’s the actual taking of life that, well, I don’t know if I can do. I can’t even watch a needle going into an arm for a blood test. It’s going to be one of those Face Your Fear and Do It Anyway experiences, I think. We’ll see. Six more weeks …

Sunday, July 3, 2011

Another week, and they'll be ready ...


Choosing when to open to the public for the season, when it’s mainly about one kind of plant, is at best an educated guess. Sure, we also have a nice variety of potted perennials that are good companions for daylilies (and the blue veronicas are starting to bloom, the echinaceas not far behind), but really, most folks come for the main show. And the whims of Mother Nature determine when that show starts.

The planned opening date for this year was, well, today. By this time last year, there were 29 cultivars in bloom, not a huge number but showing enough variety to get started. This year’s different; although the spring rains have encouraged the growth of so many scapes and buds that we know the show will be spectacular, the cool temperatures have delayed the opening of those buds, and at present there are only 12 registered cultivars in bloom, most of them showing only one blossom so far.

So all week we’ve been on the fence; to open, or not? Imagine seeing a sign for daylilies, stopping in, and finding only a sea of foliage! Today’s forecast of thunderstorms finally tipped the scales; next Sunday will be the first official Open Day, and we’re sure to have a sea of blossoms by then.

BTW, that's a group of "Bubbly" at the top; the first one just opened this morning. (so yes, the photo's from last year!)